Beneficiary Appointment

Login to your myPrudential at www.prudential.com.hk/myprudential
- 1.
-
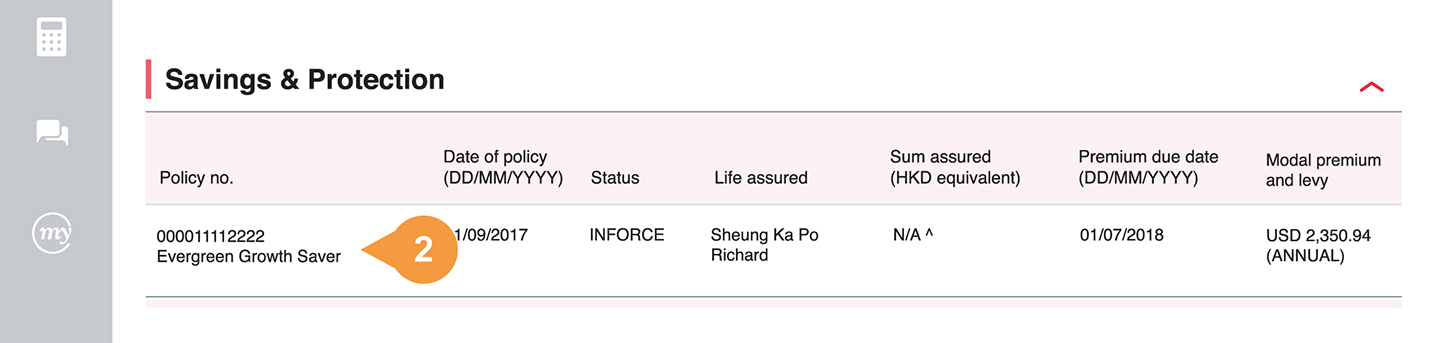
Expand policy list by clicking “View all” or respective category.
- 2.
-
Click on the policy number to enter Policy Details.
- 3.
-
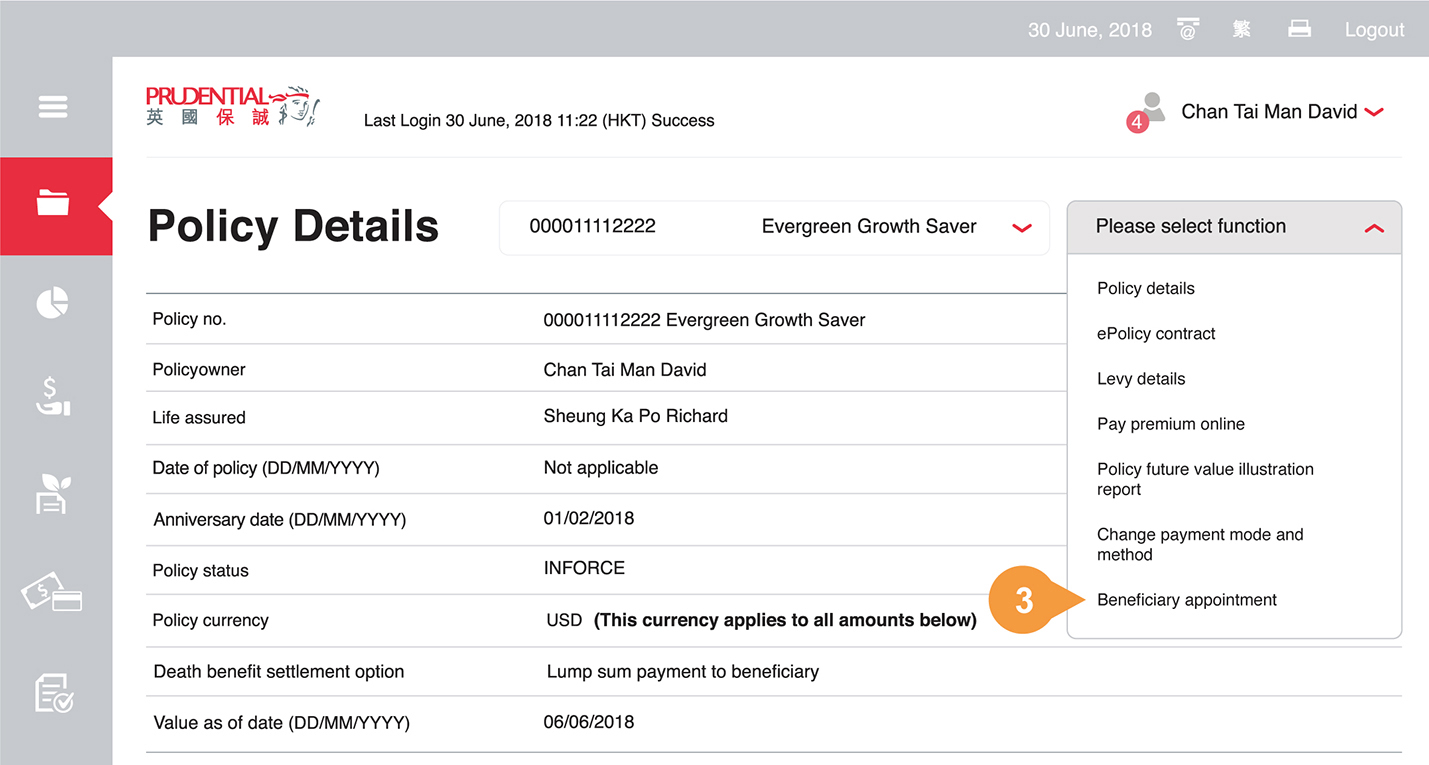
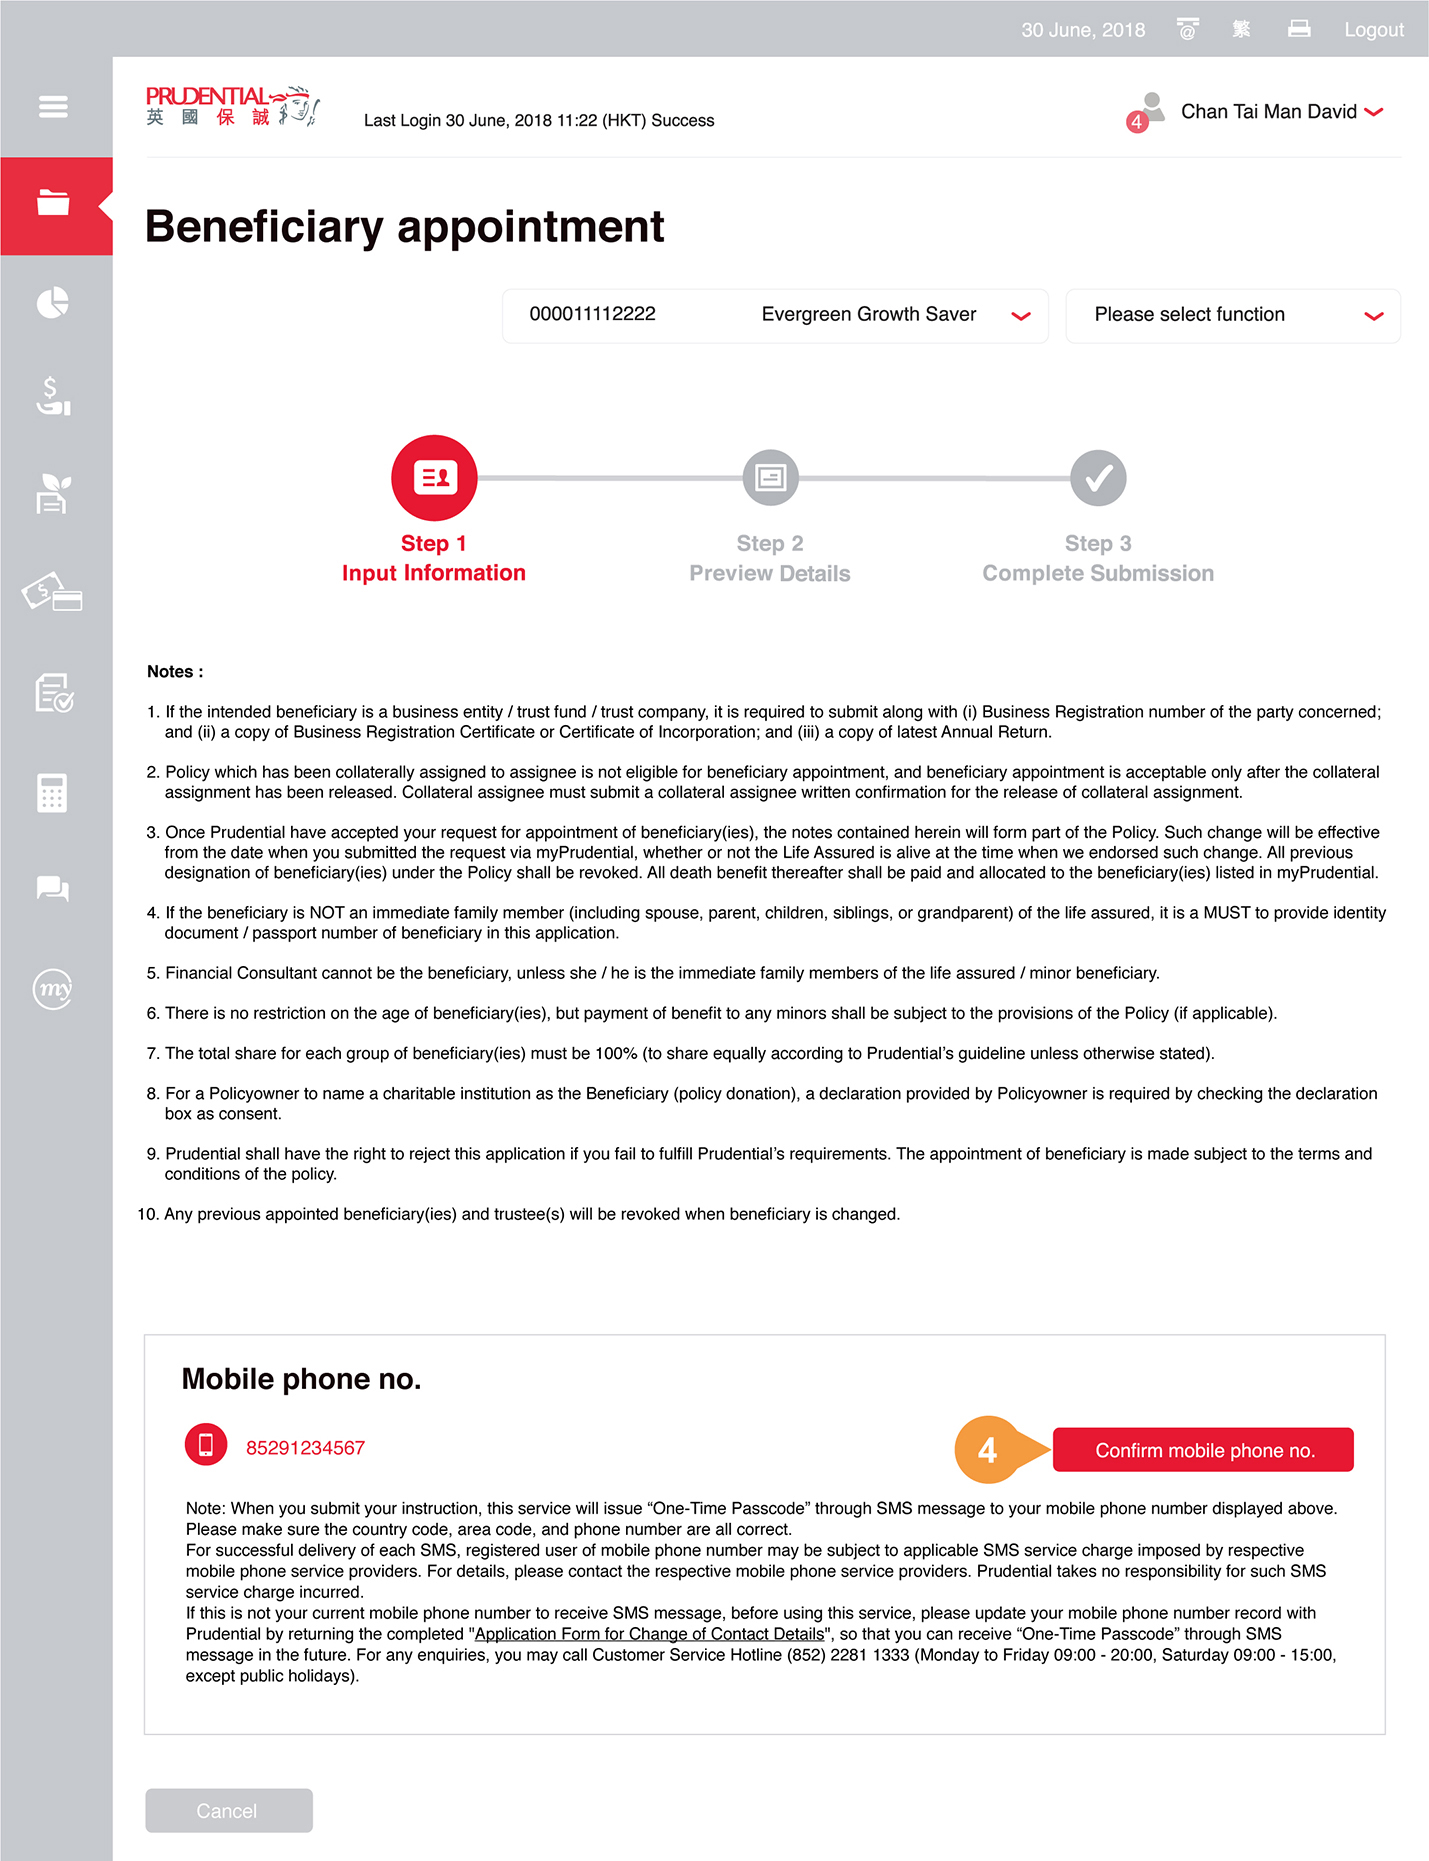
Select “Beneficiary appointment” from the dropdown menu “Please select function” on the top right.
Note: This service is only applicable to eligible policy. System message will prompt if your selected policy is not eligible for using Beneficiary Appointment Service.
- 4.
-
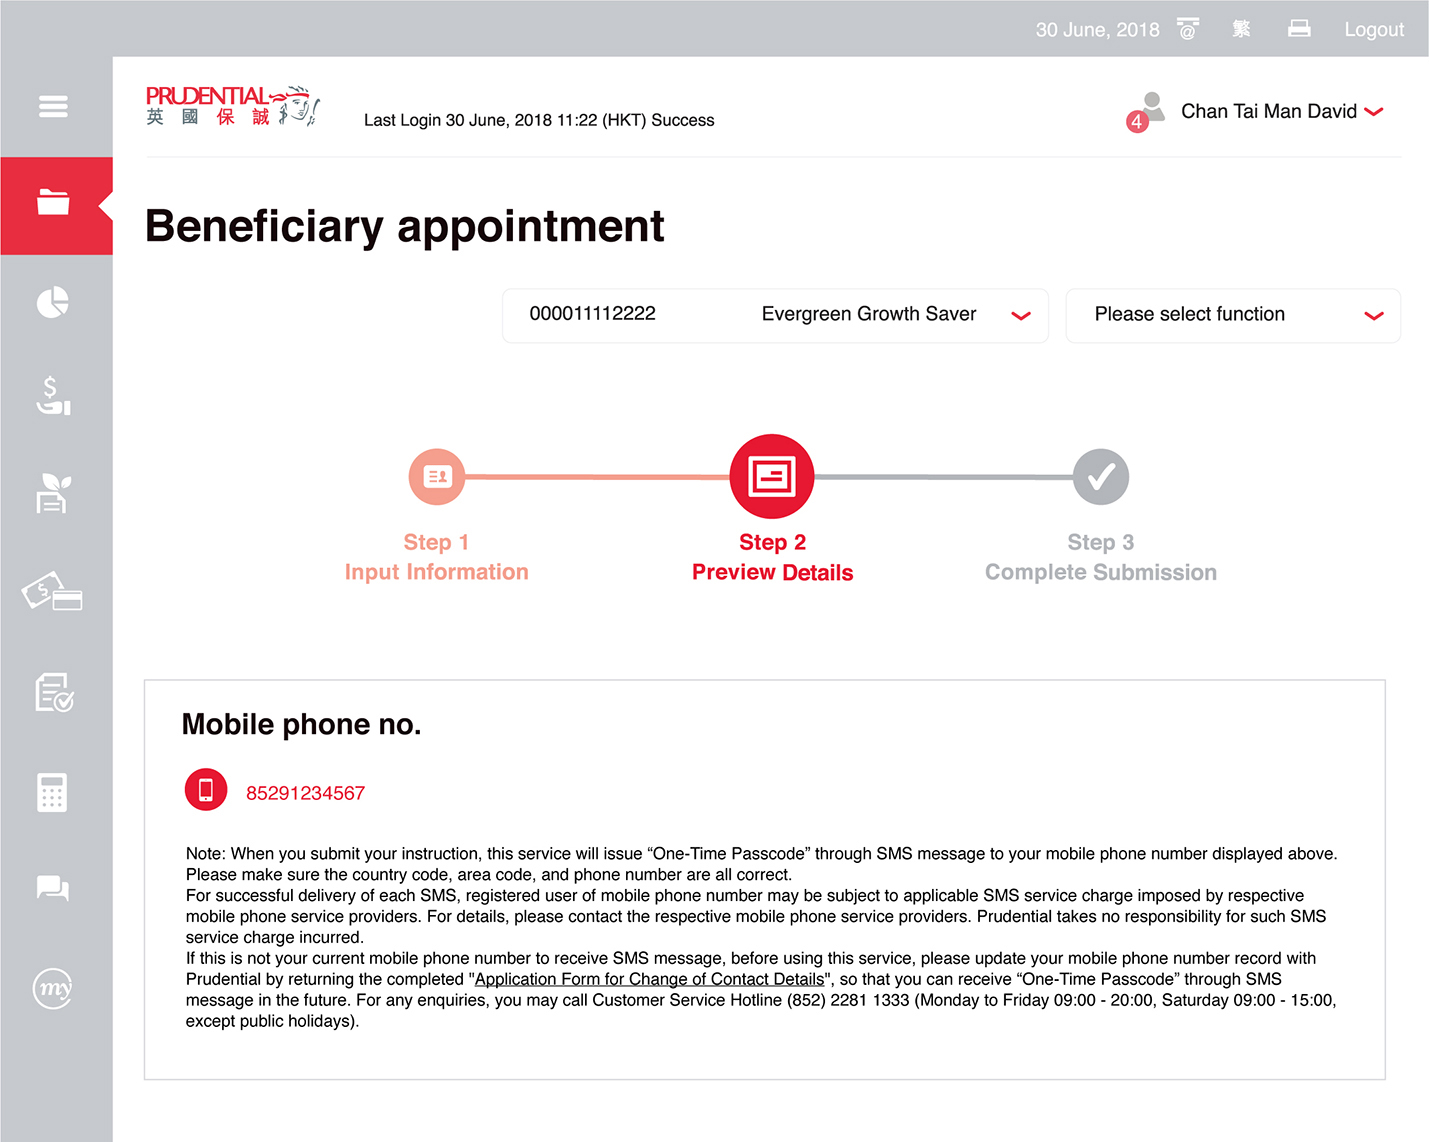
Read the notes and check the accuracy of the displayed mobile phone number, then press “Confirm mobile phone no.”.
If this is not your current mobile phone number to receive SMS message, before using this service, please update your mobile phone number record with Prudential by returning the completed “Application Form for Change of Contact Details”, so that you can receive “One-Time Passcode” through SMS message in the future.
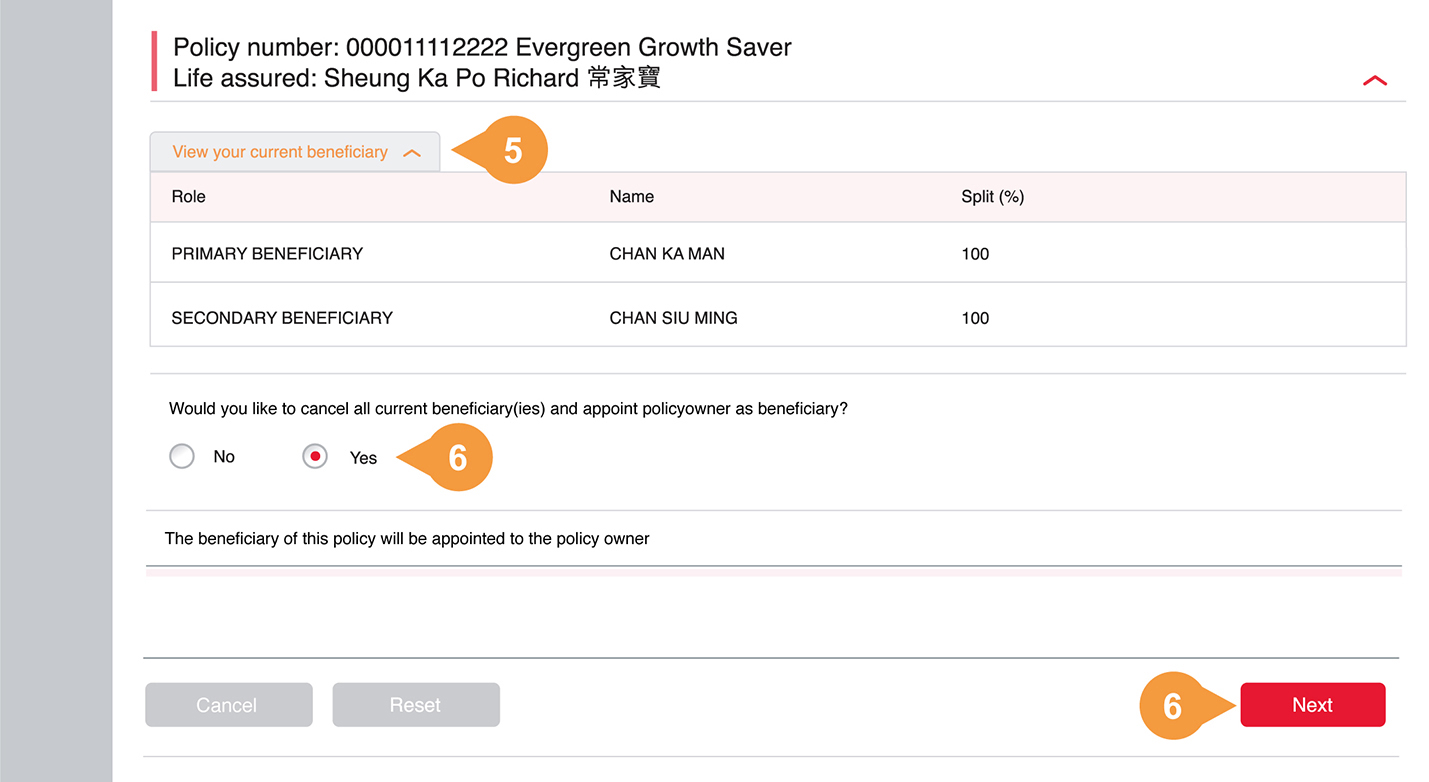
The page will display your current beneficiary(ies) under your selected policy.
- 5.
-
Click “View your current beneficiary” to view current beneficiary(ies) information with split percentage(s) of your selected policy.
- 6.
-
Select “Yes” and click “Next” if you wish to cancel all current beneficiary (ies) and appoint policyowner as beneficiary.
OR
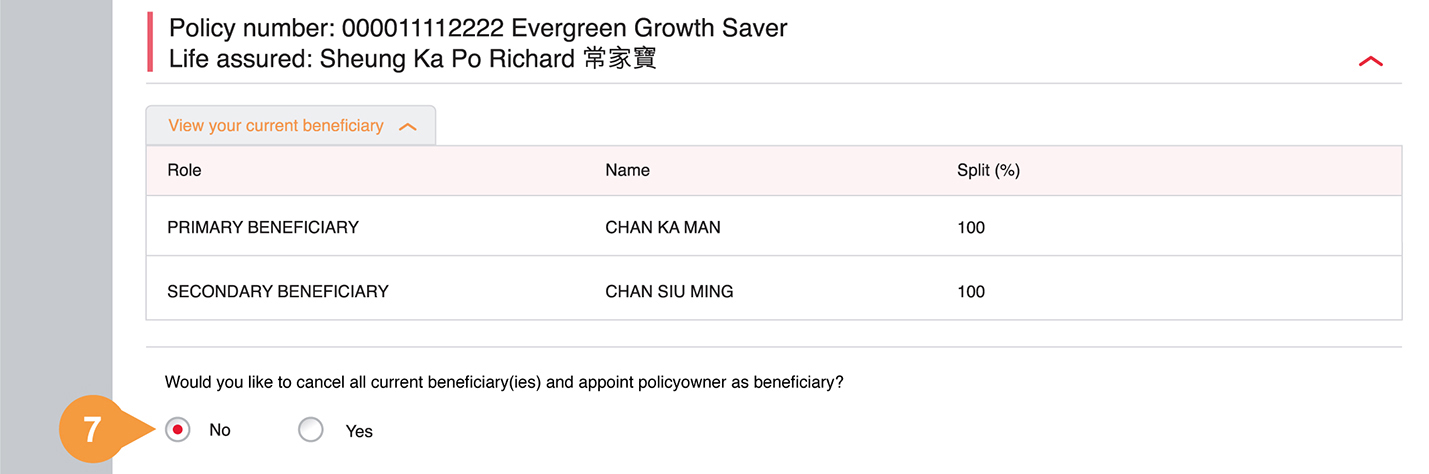
- 7.
-
Select “No” if you wish to edit information of beneficiary.
The page will display the Primary Beneficiary(ies) and Secondary Beneficiary(ies) (if any).
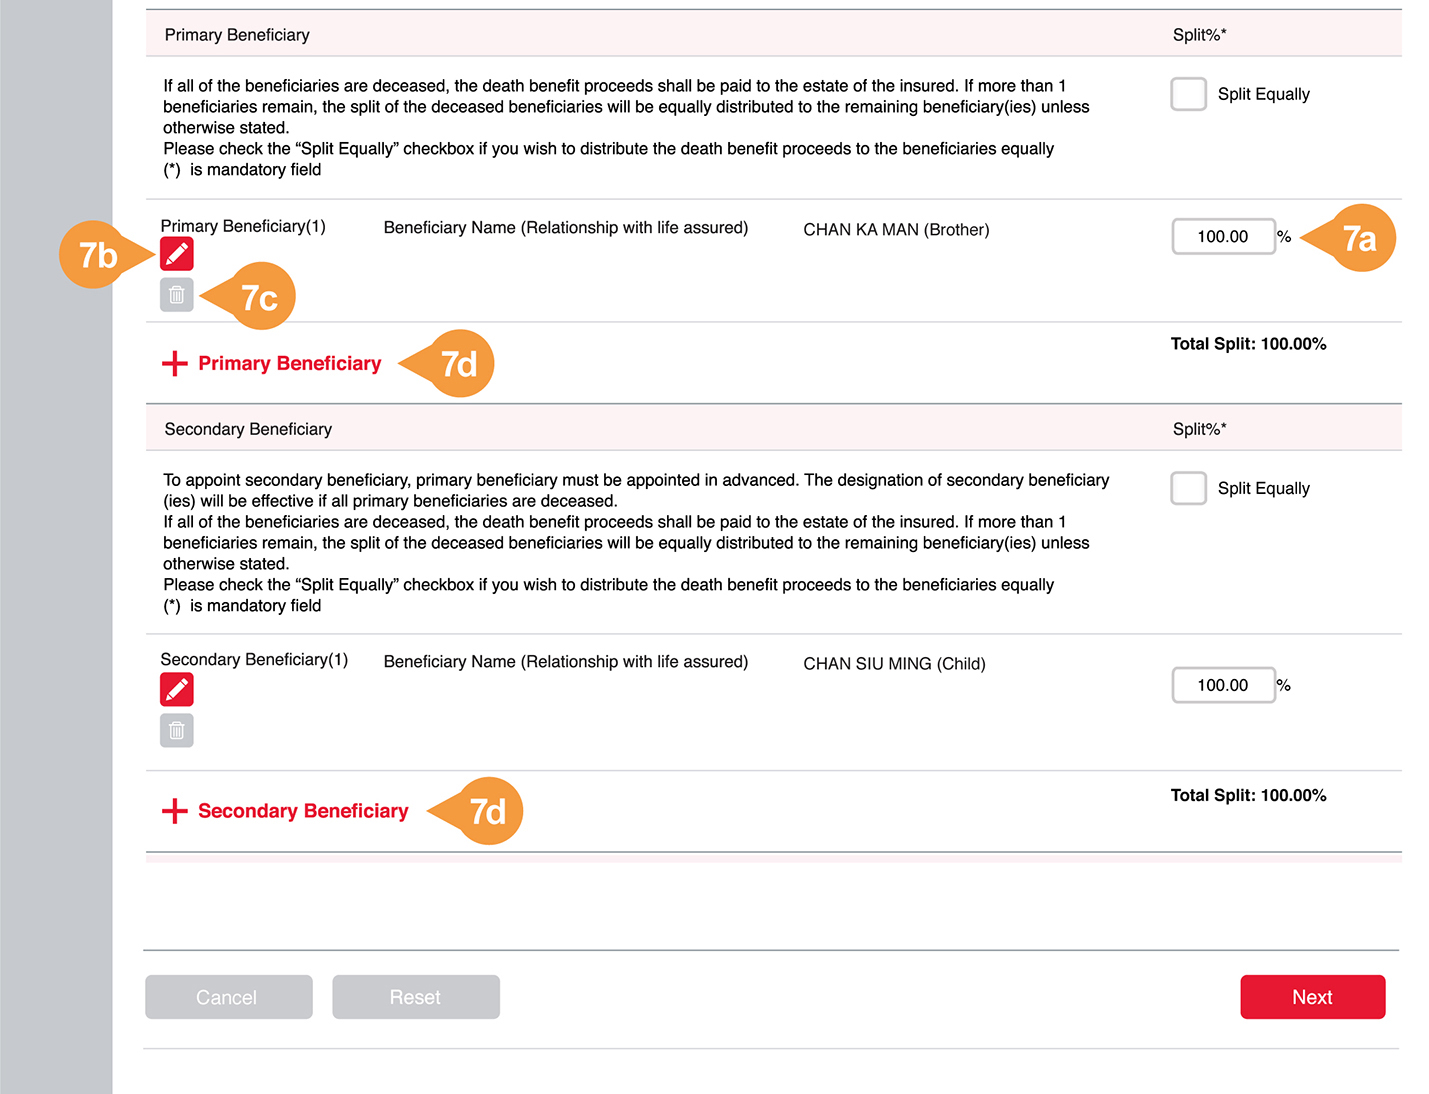
You can change split percentage(s) among beneficiaries, remove an individual beneficiary, edit information of individual beneficiary and/or appoint new beneficiary(ies).
- 7a.
-
To change split percentage(s) among beneficiaries:
Enter the percentage(s) you wish to allocate for each individual beneficiary under each beneficiary group.
Note: The total split in each beneficiary group (i.e. Primary Beneficiary or Secondary Beneficiary) must equal to 100%.
- 7b.
-
To edit information of individual beneficiary:
Click the icon
 .
.
- 7c.
-
To remove an individual beneficiary:
Click the icon
 .
.
- 7d.
-
To appoint new beneficiary to your selected policy:
Click “+ Primary Beneficiary” or “+ Secondary Beneficiary” to appoint new beneficiary under respective group.
You can appoint Individual, Corporate or Charity as Beneficiary Type.
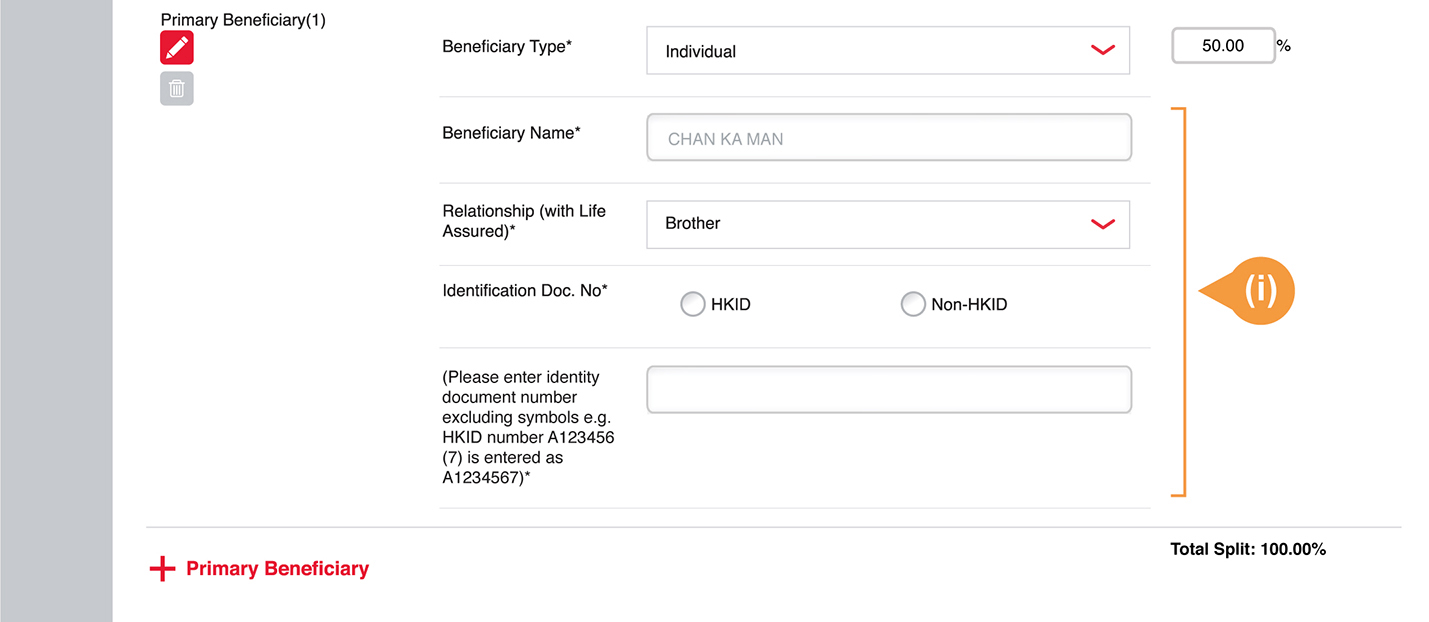
- (i)
-
Appoint Individual as Beneficiary Type:
Please provide Beneficiary Name, Relationship with Life Assured and Beneficiary’s Identification Document Number.
Note: If the beneficiary is NOT an immediate family member (including spouse, parent, child, siblings, grandparent, or grandchild) of the life assured, you must provide identity document / passport number of beneficiary.
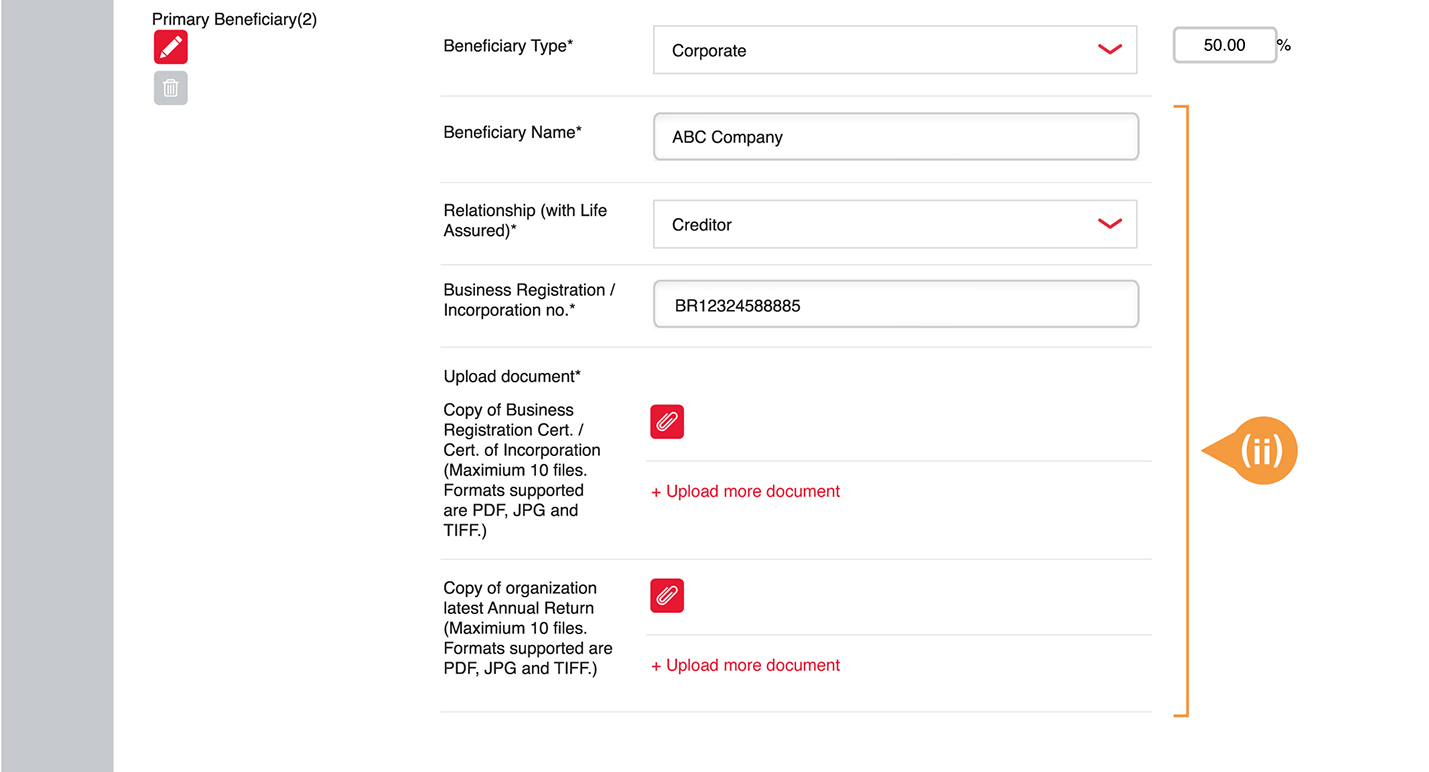
- (ii)
-
Appoint Corporate as Beneficiary Type:
Please provide Beneficiary Name, Relationship with Life Assured and Business Registration / Incorporation Number.
Please upload Copy of Business Registration Certificate / Certificate of Incorporate and the organization latest Annual Return. You can upload a maximum of 10 files of each document type.
Note: The file formats have to be JPEG, PDF or TIFF, file size cannot exceed 5MB for each file.
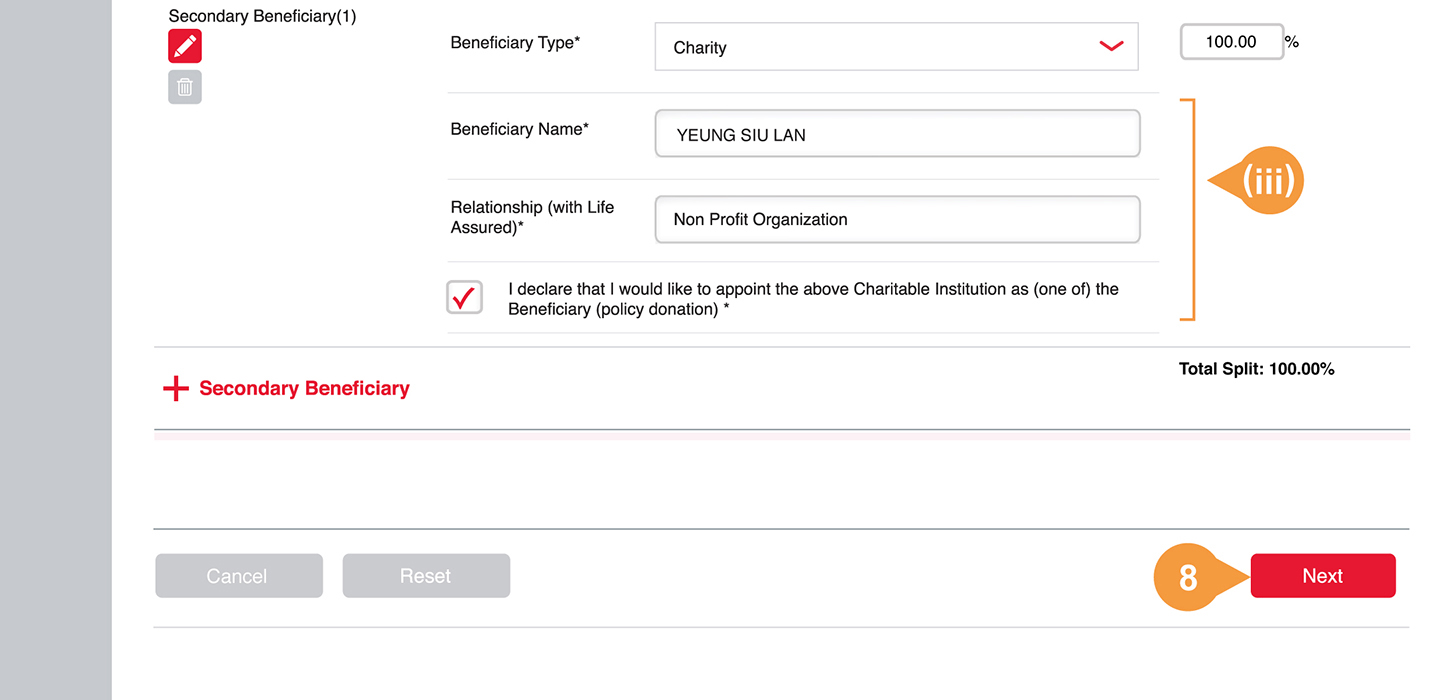
- (iii)
-
Appoint Charity as Beneficiary Type:
After providing Beneficiary Name, please check and declare that you would like to appoint the Charitable Institution as (one of) the Beneficiary (policy donation).
- 8.
-
Click “Next”.
Preview your beneficiary appointment summary and check all information are correct.
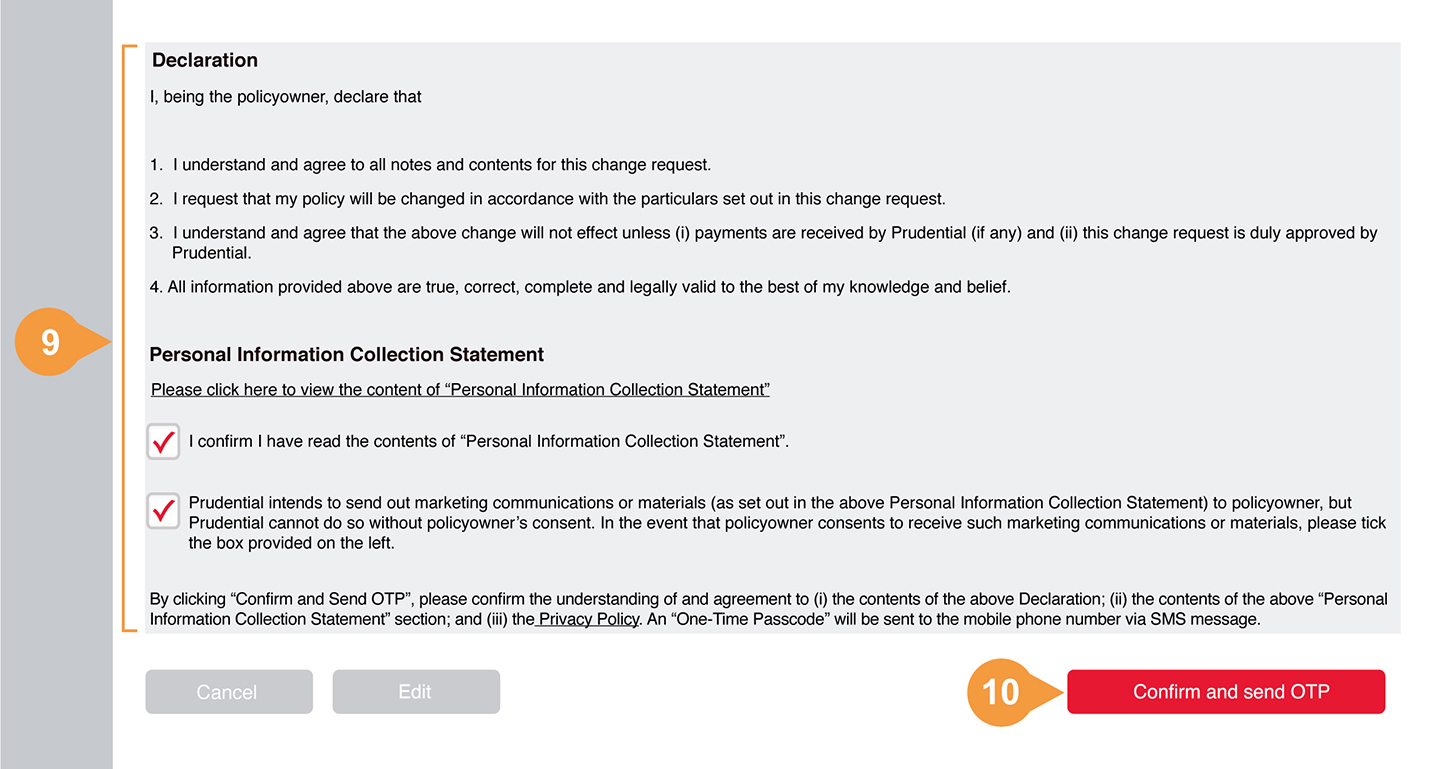
- 9.
-
Read the Declaration and the content of “Personal Information Collection Statement”, check the box to confirm you have read the “Personal Information Collection Statement”.
- 10.
-
Click “Confirm and send OTP”.
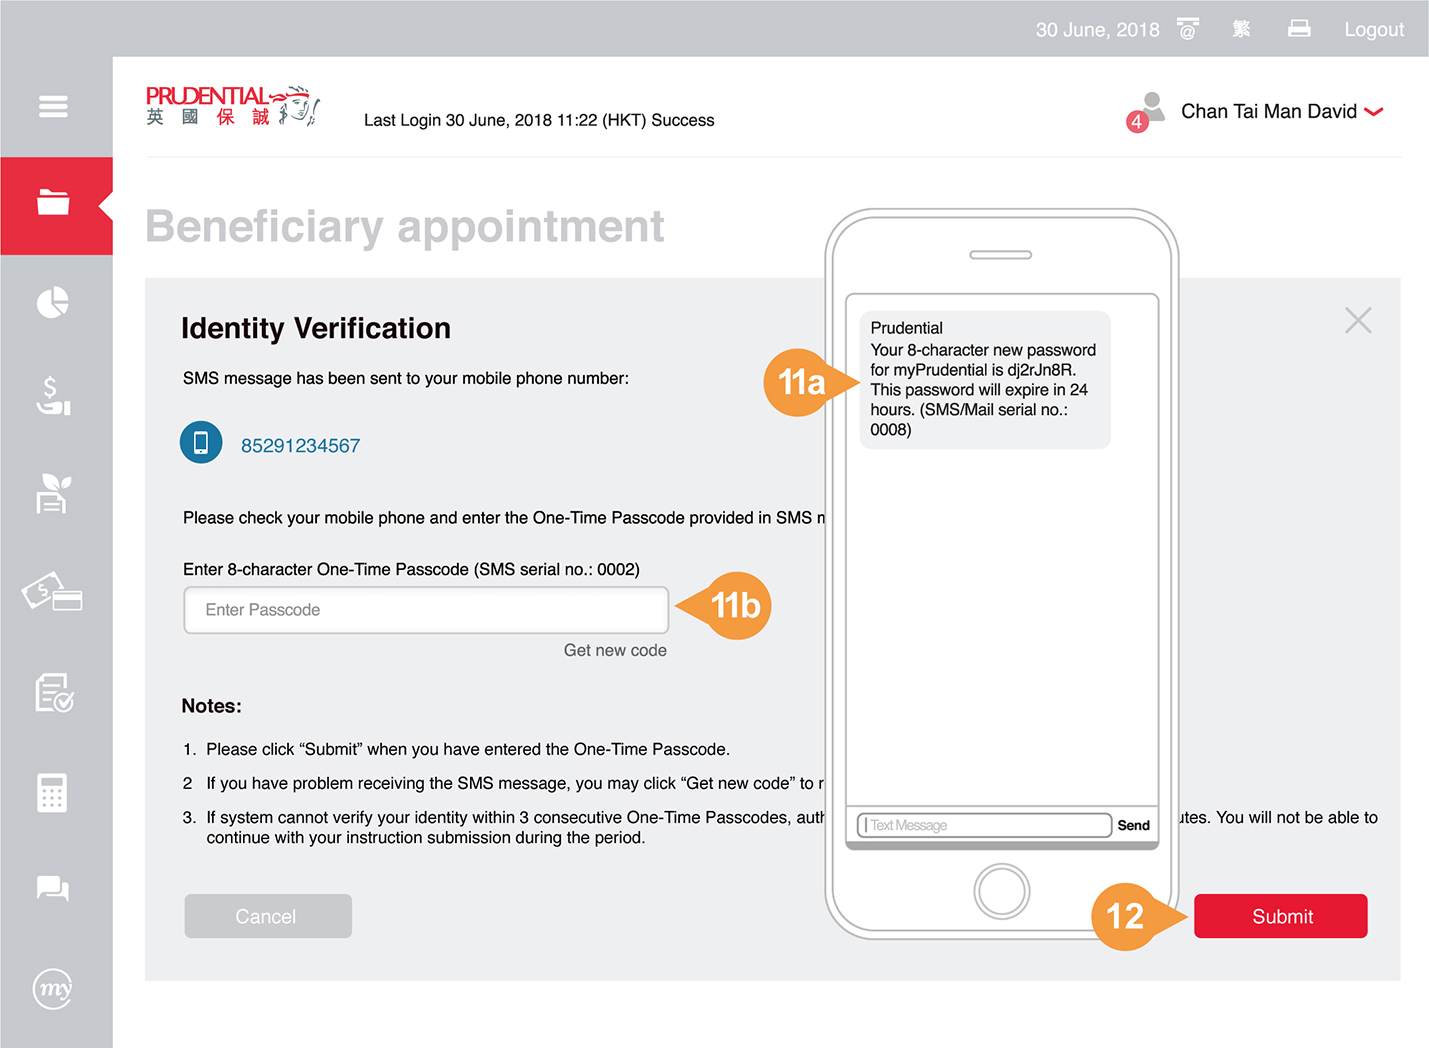
A One-Time Passcode will be sent by SMS message to your registered mobile phone number.
- 11a.
-
Enter the 8-character One-Time Passcode. Passcode will expire in 15 minutes.
- 11b.
-
Check and make sure the One-Time Passcode pairs correctly with the 4-digit SMS serial number.
- 12.
-
Click “Submit”.
You will be prompted if the verification code is entered incorrectly. Please try again or get a new code by clicking “Get new code” button.
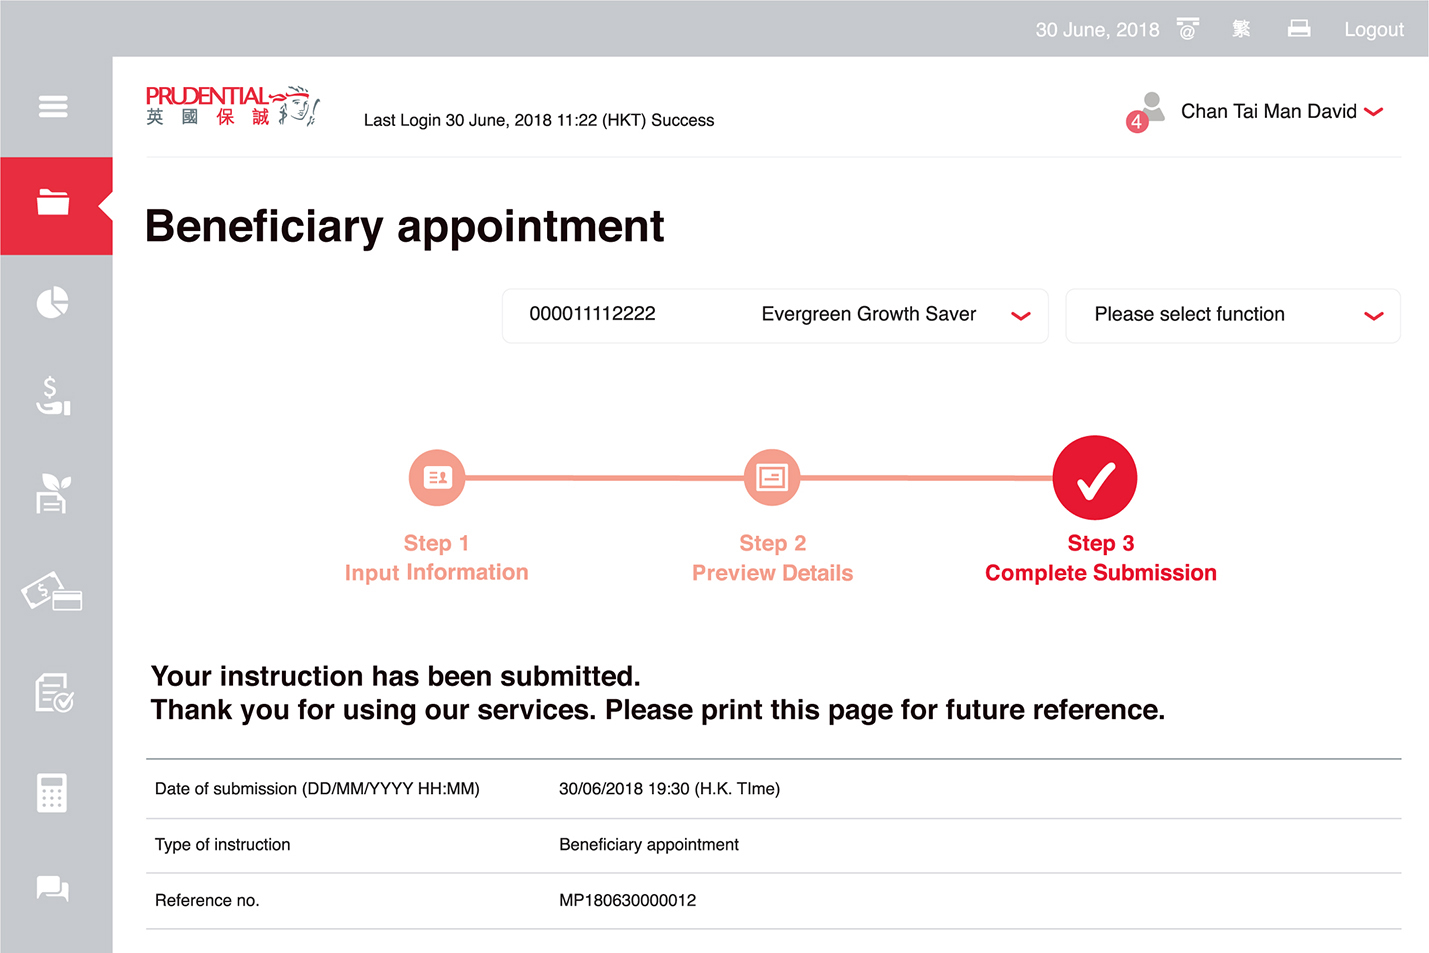
Complete submission.
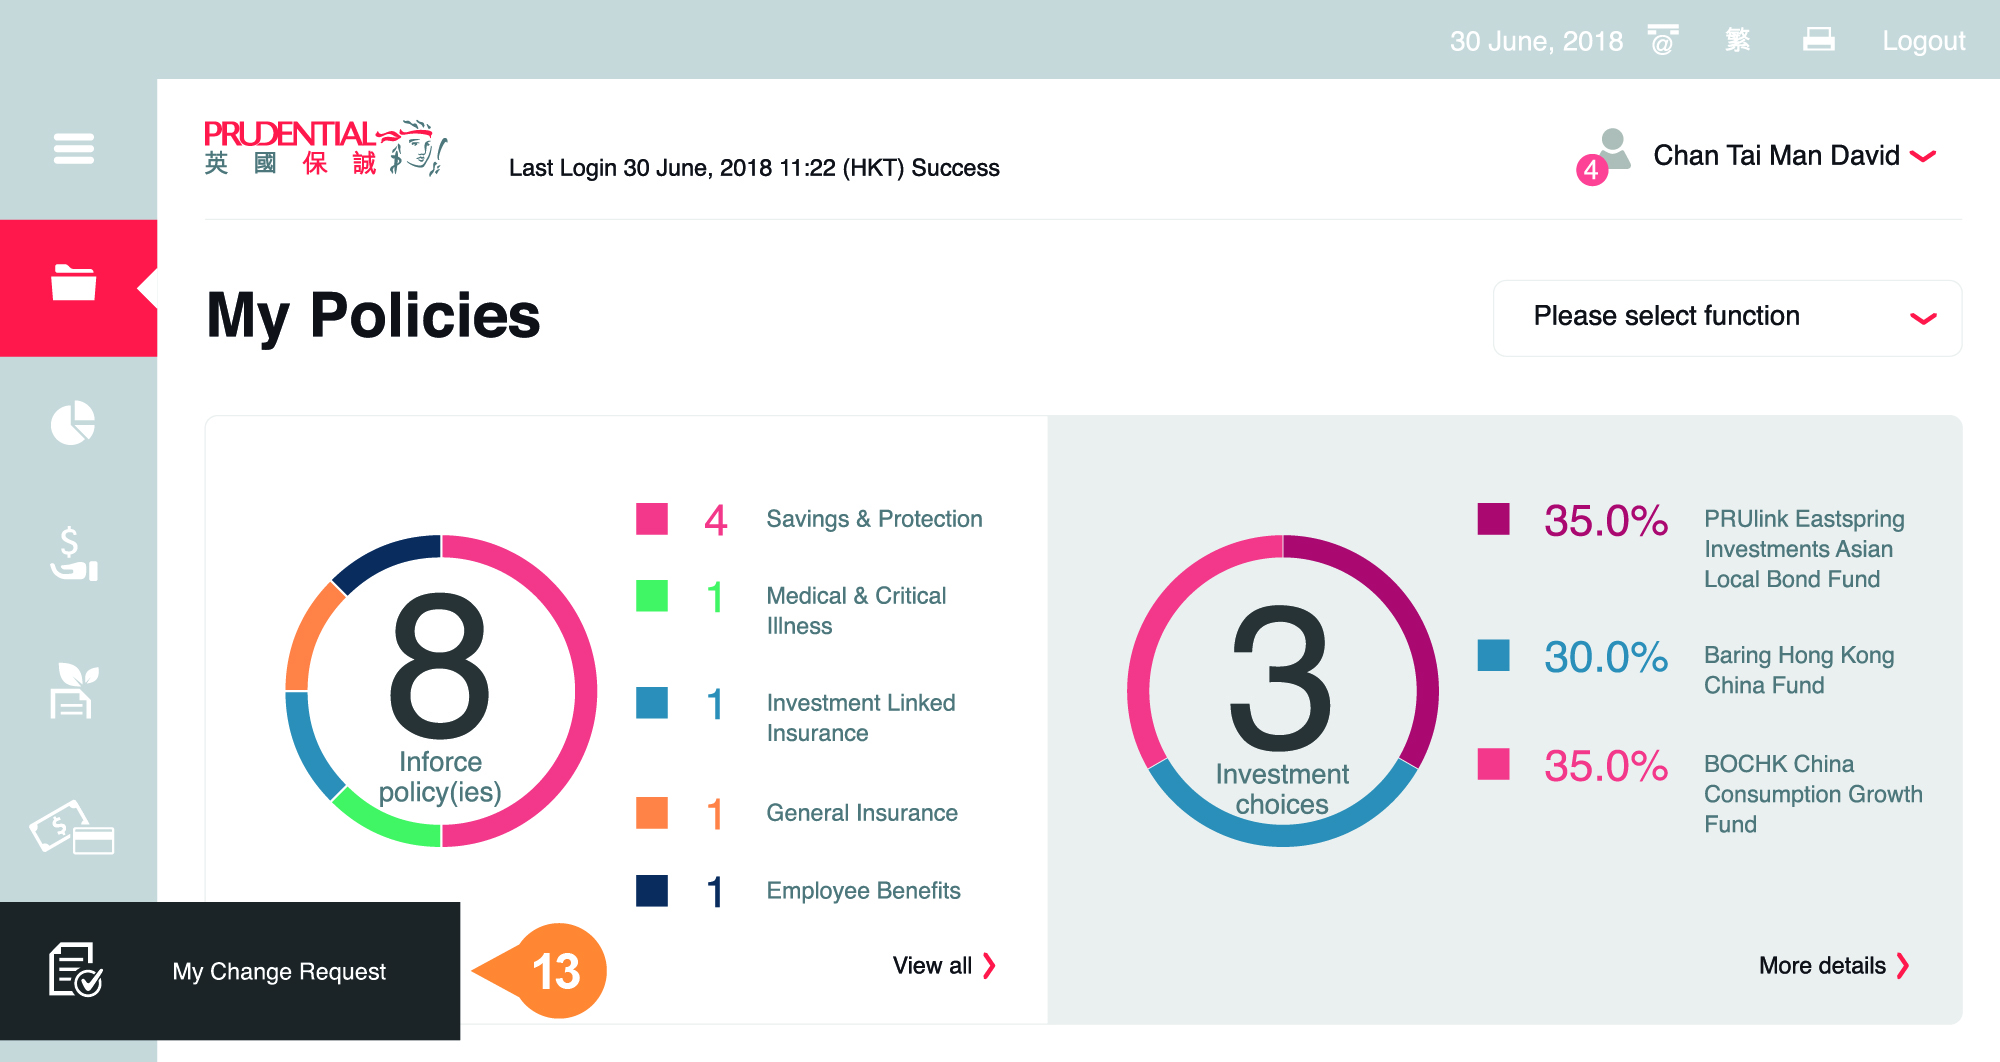
- 13.
-
Select and click “My Change Request” from the main menu on the left.
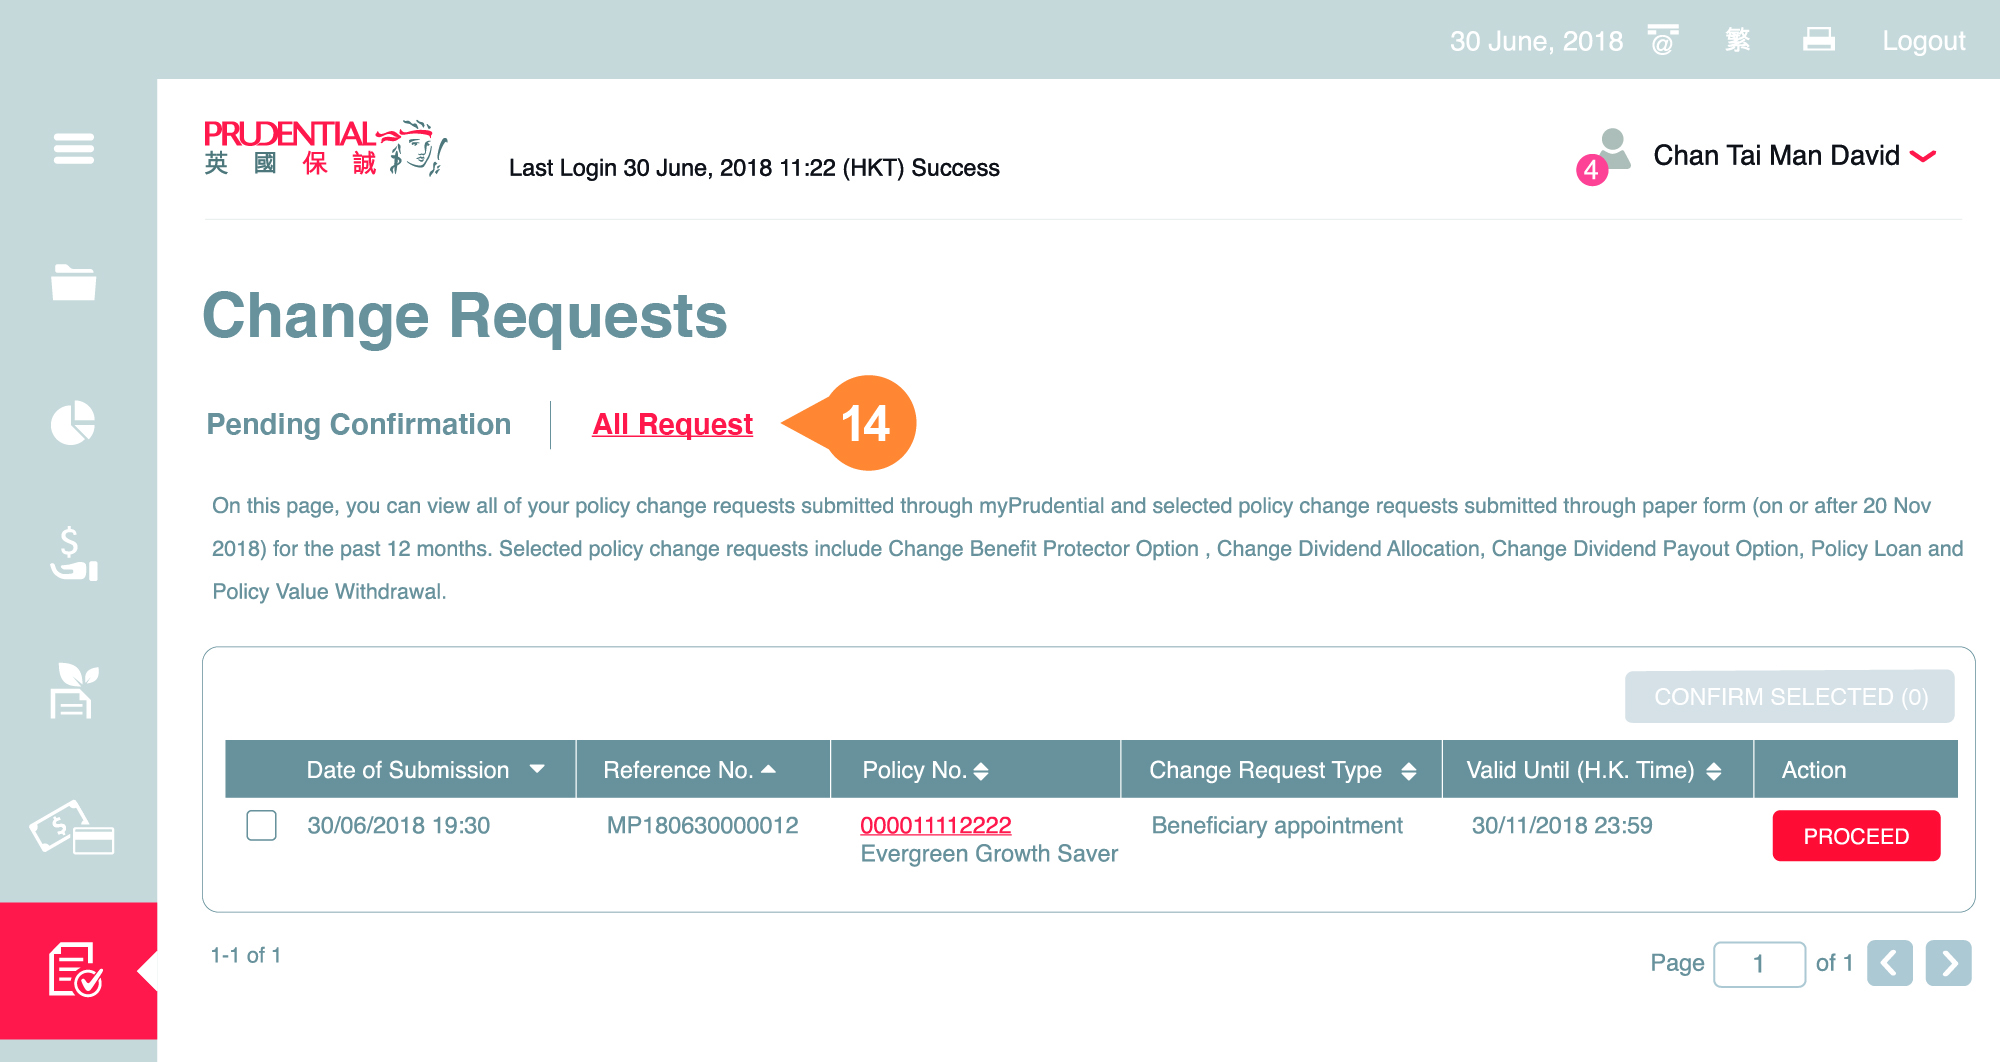
- 14.
-
Click “All requests” from the indicators display on the top.
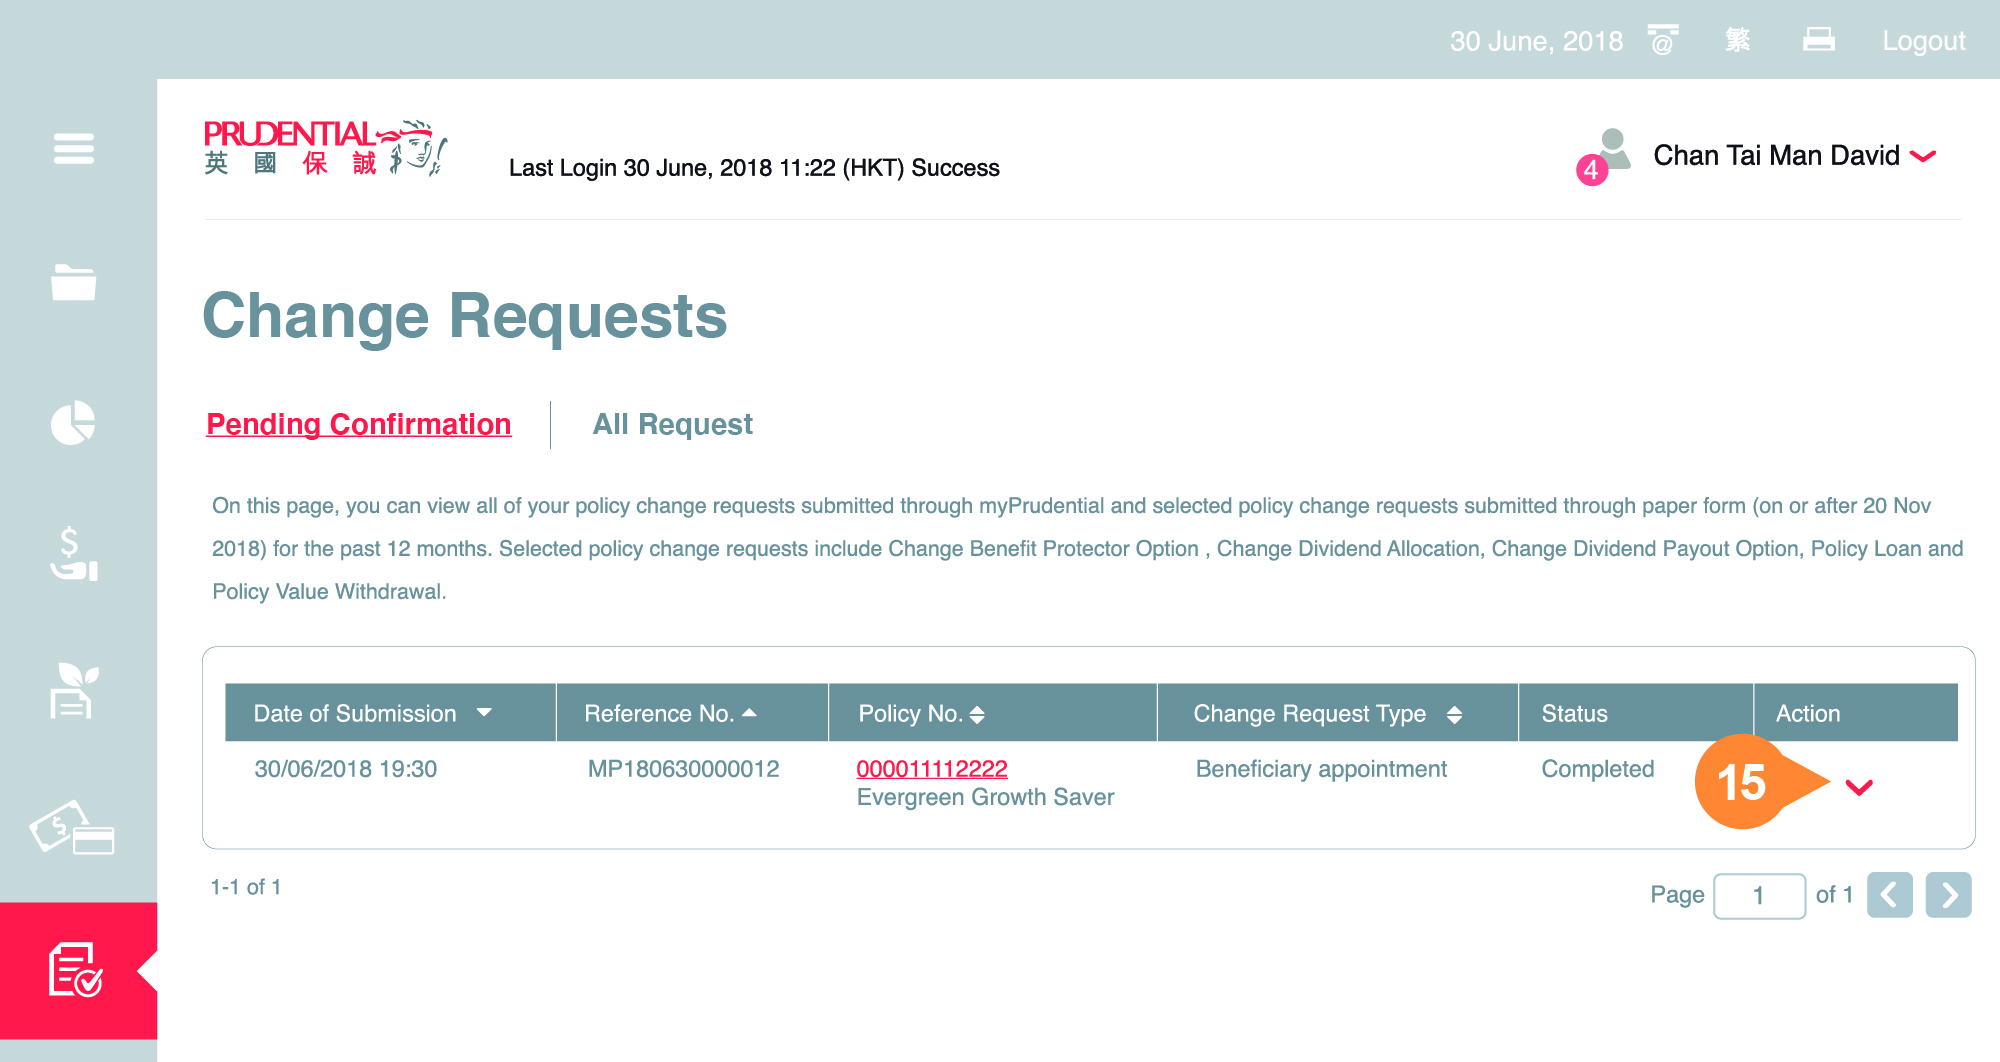
- 15.
-
Select your change request items and Click the arrow on “Request details” column to view your submitted instruction details via online / paper submission.
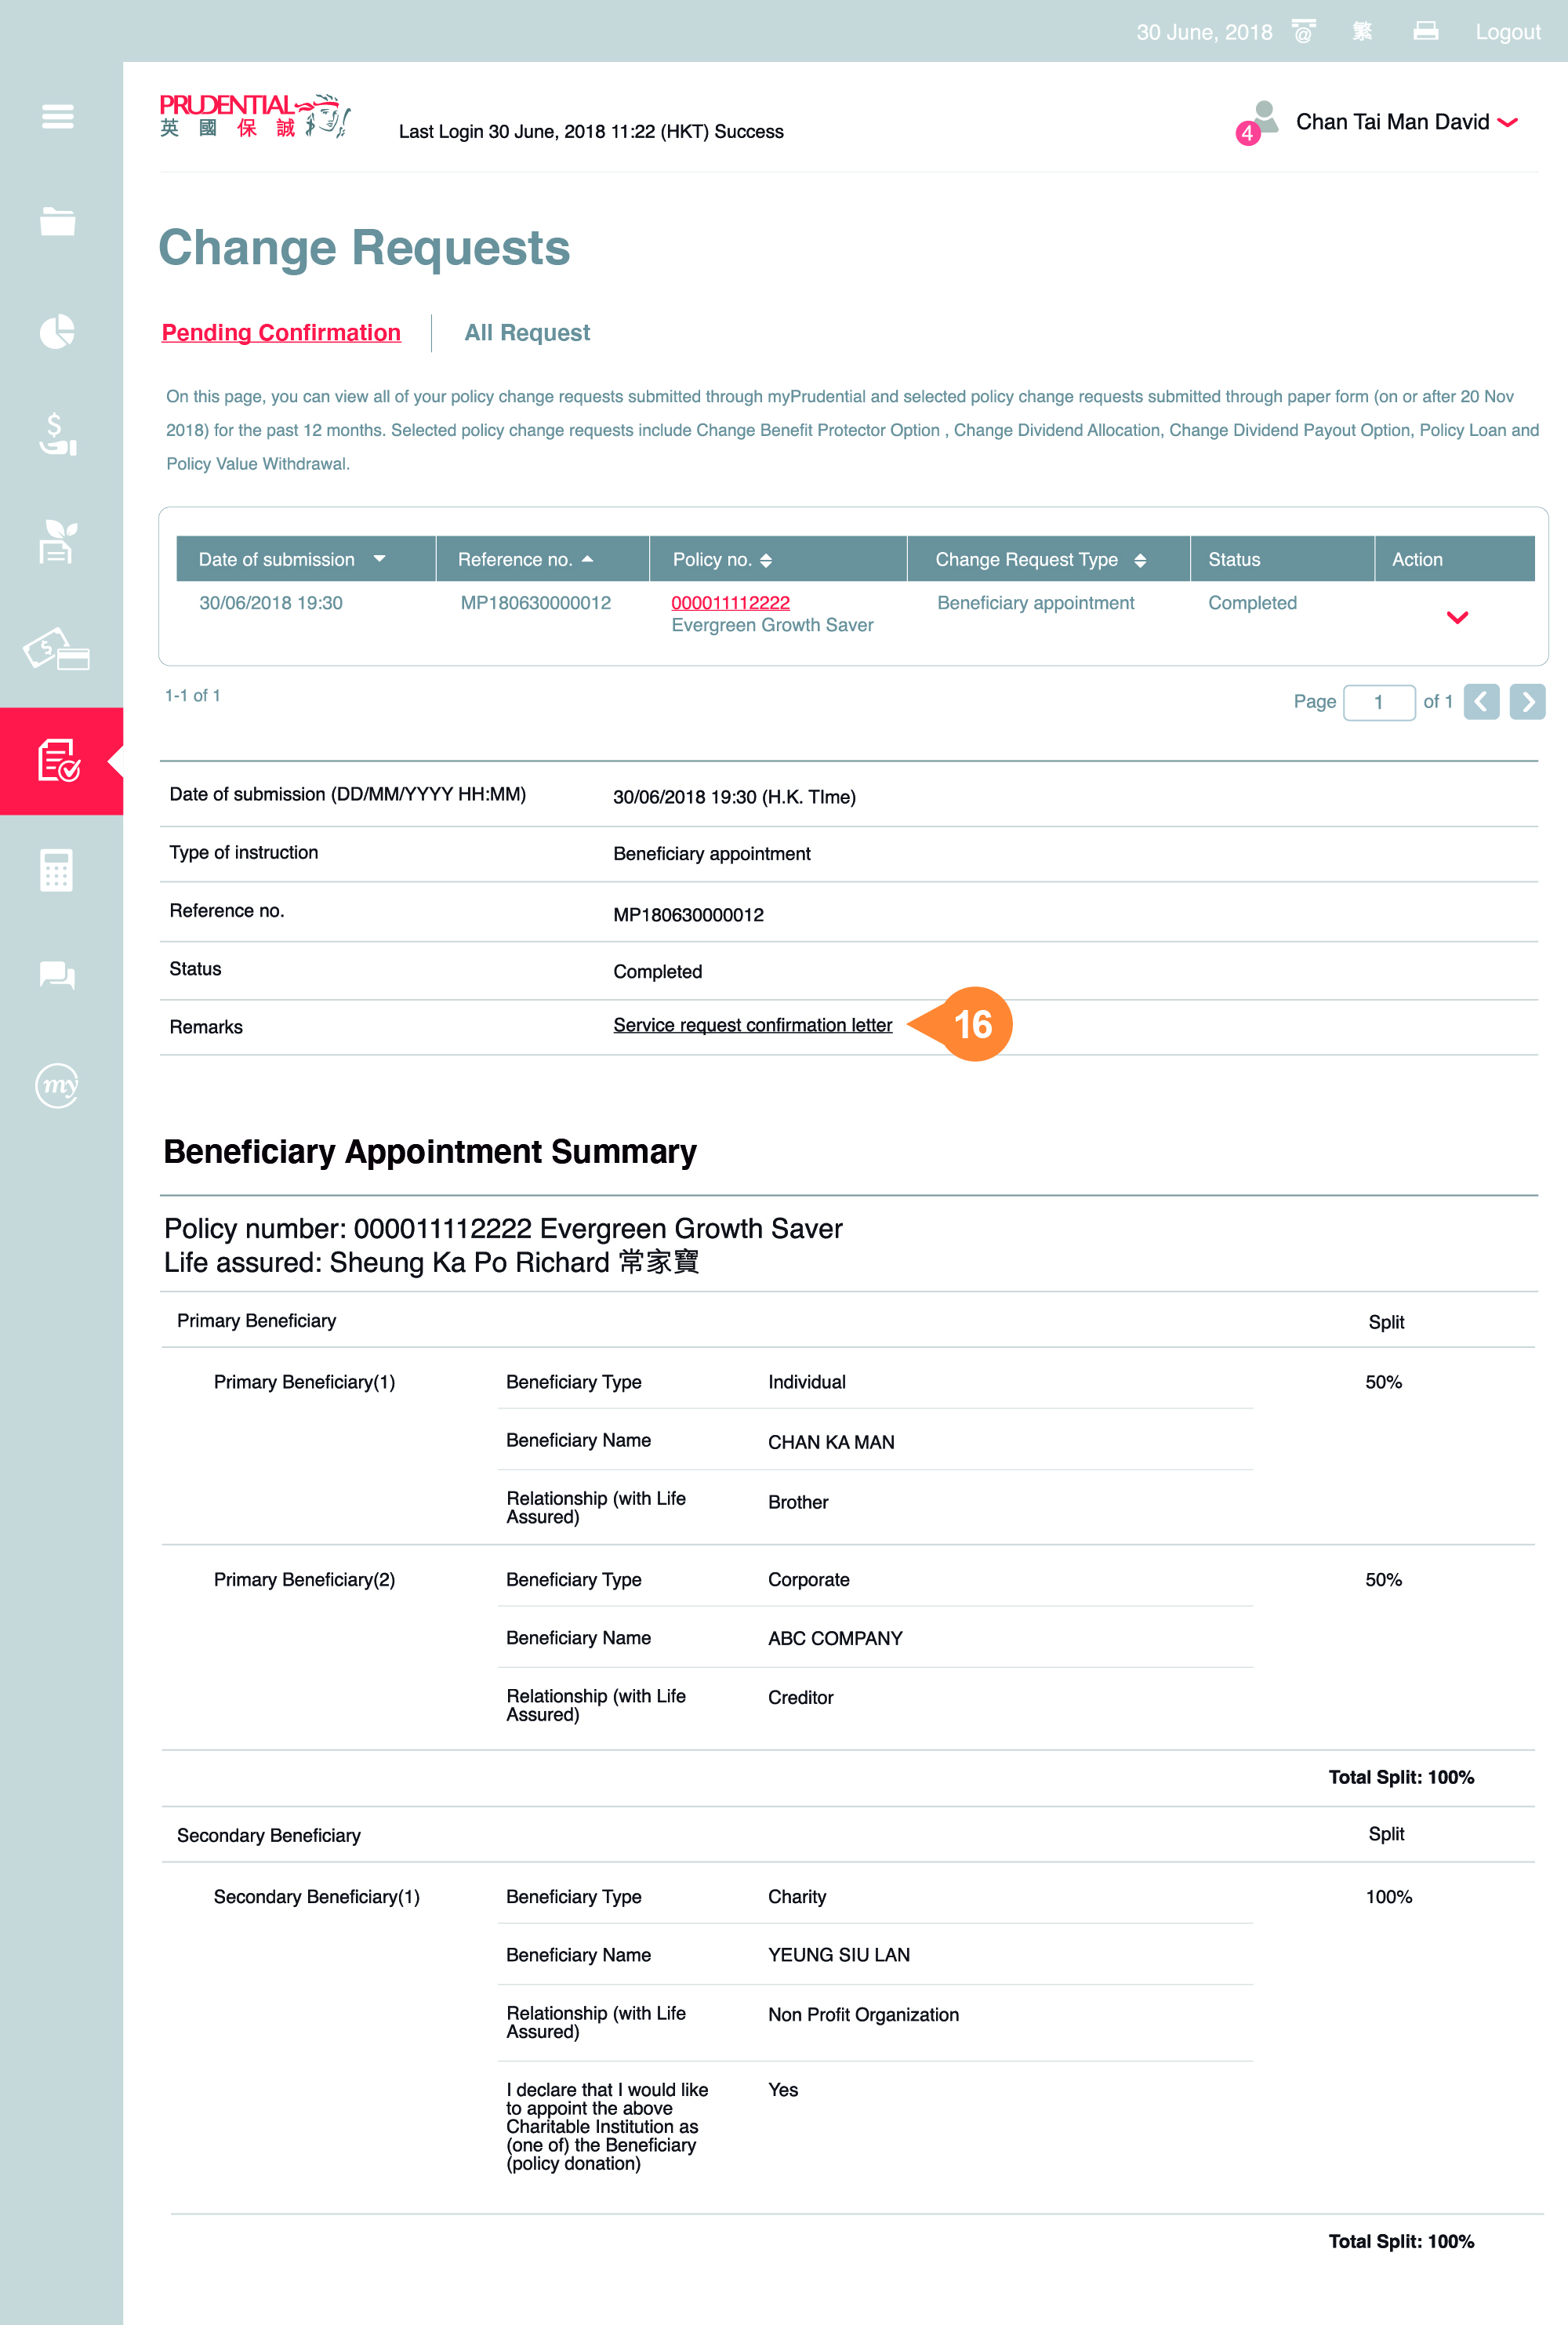
- 16.
-
The change detail is displayed at the bottom of the page. Click the document name if you wish to view and download the relevant documents.